一、为什么要使 用负载均衡技术?
1、系统高可用性
2、 系统可扩展性
3、 负载均衡能力
LVS+keepalived能很好的实现以上的要求,LVS提 供负载均衡,keepalived提供健康检查,故障转移,提高系统的可用性!采用这样的架构以后 很容易对现有系统进行扩展,只要在后端添加或者减少realserver,只要更改lvs的 配置文件,并能实现无缝配置变更!
二、LVS+Keepalived介绍
1、 LVS
LVS是一个开源的软件,可以实现LINUX平台下的简单负载均衡。LVS是Linux Virtual Server的缩写,意思是Linux虚拟服务器。目前有三种IP负 载均衡技术(VS/NAT、VS/TUN和VS/DR);八种调度算法(rr,wrr,lc,wlc,lblc,lblcr,dh,sh)。
2、 keepalived
Keepalived 是运行在lvs 之上,它的主要功能是实现真实机的故障隔离及负载均衡器间的失败 切换,提高系统的可用性
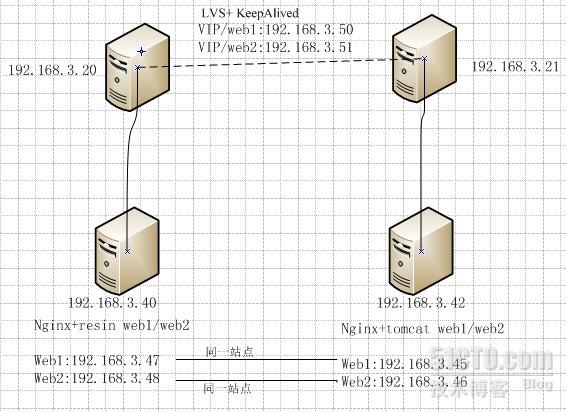
三、LVS+keepalived负载均衡架构图:
四、LVS+keepalived的安装和配置
1. 配置环境
System OS:CentOS release 5.6
Software:ipvsadm-1.24.tar.gz, keepalived-1.1.19.tar.gz
2. 信息列表
|
名称
|
IP
|
|
LVS-Master
|
192.168.3.20
|
|
LVS-BACKUP
|
192.168.3.21
|
|
LVS-VIP
|
192.168.3.50 / 192.168.3.51
|
|
Web1
|
192.168.3.45 /192.168.3.47
|
|
Web2
|
192.168.3.46 / 192.168.3.48
|
注意:CentOS 6.0安装ipvsadm 1.26
此文档不适用于在CentOS 5.x安装ipvsadm 1.26。原因是ipvsadm 1.26适用于kernel 2.6.28及之后的内核版本。
如果你要在CentOS 5.X上编译安装ipvsadm,只能下载安装1.24的
我的系统环境是安装了开发工具和开发库的,所以不存在gcc没安装的情况。CentOS 5.x也是如此
如果你要在CentOS 5.X上编译安装ipvsadm,只能下载安装1.24的
我的系统环境是安装了开发工具和开发库的,所以不存在gcc没安装的情况。CentOS 5.x也是如此
五、安装:
1、安装依赖包及创建:
#yum check-update
#yum -y install ibnl* popt*
1、安装依赖包及创建:
#yum check-update
#yum -y install ibnl* popt*
2、cenos5.X最开始的内核是2.6.18-238.el5,但是我发现在/usr/src/kernels里面没有2.6.18-238.el6的包本;来是准备使用编译安装的,发现kernel.org在维护。
#yum -y install kernel-devel
#yum -y update kernel
3、安装前准备动作:
#modprobe ip_vs //内核加载ip_vs模块
#lsmod |grep ip_vs //查看是否加载成功。
ip_vs 122113 0
#ln -s /usr/src/kernerls/2.6.18-274.el5-x86_64/ /usr/src/linux //生成一个链接文件
#cp /usr/src/kernels/2.6.18-274.el5/include/net/ip_vs.h /usr/inclide/net/ //这个很重要,否则在安装ipvsadm的时候会提示缺少*.h文件
#yum -y install openssl openssl-devel //安装keepalived需要
前期准备工作完成,有些安装软件的依赖文件请慢慢琢磨着安装吧。比如gcc gcc-c++之类的。现在准备下载ipvsadm和keepalived了
4、下载ipvsadm 1.24
For CentOS 5.x
wget http://www.linuxvirtualserver.org/software/kernel-2.6/ipvsadm-1.24.tar.gz
For CentOS 6.x
wget http://www.linuxvirtualserver.org/software/kernel-2.6/ipvsadm-1.24.tar.gz
For CentOS 6.x
#cd /usr/src/ipvsadm-1.24/
# make && make install
2、分别下载安装安装keepalived
# tar zxvf keepalived-1.1.19.tar.gz -C /usr/src/
# cd /usr/src/keepalived-1.1.19/
# ./configure --prefix=/usr/local/keepalived
正确完成安装会显示如下信息:
Keepalived configuration
------------------------
Keepalived version : 1.1.19
Compiler : gcc
Compiler flags : -g -O2
Extra Lib : -lpopt -lssl -lcrypto
Use IPVS Framework : Yes
IPVS sync daemon support : Yes
Use VRRP Framework : Yes
Use Debug flags : No
# make && make install
# mkdir -p /etc/keepalived
# cp /usr/local/keepalived/sbin/keepalived /usr/sbin/
# cp /usr/local/keepalived/etc/sysconfig/keepalived /etc/sysconfig/
# cp /usr/local/keepalived/etc/rc.d/init.d/keepalived /etc/init.d/
# cp /usr/local/keepalived/etc/keepalived/keepalived.conf /etc/keepalived/
3、 配置keepadlived LVS-Master(主)的配置文件如下:
# vi /etc/keepalived/keepalived.conf
! Configuration File for keepalived
global_defs {
notification_email {
[email protected] #email 通知
}
notification_email_from [email protected]
smtp_server 127.0.0.1
smtp_connect_timeout 30
router_id LVS1 # 设置lvs的id,在一个网络内应该是唯一的
}
vrrp_sync_group test { #设置vrrp组
group {
xxoo
}
}
vrrp_instance xxoo {
state MASTER #设置lvs的状态,MASTER和BACKUP两种,必须大写
interface eth0 #设置对外服务的接口
lvs_sync_daemon_inteface eth0 #设置lvs监听的接口
virtual_router_id 51 #设置虚拟路由表示
priority 150 #设置优先级,数值越大,优先级越高
advert_int 5 #设置同步时间间隔
authentication { #设置验证类型和密码
auth_type PASS
auth_pass 1111
}
virtual_ipaddress { #设置lvs vip
192.168.3.50
}
}
virtual_server 192.168.3.50 80 {
delay_loop 6 #健康检查时间间隔
lb_algo rr #负载均衡调度算法
lb_kind DR #负载均衡转发规则
nat_mask 255.255.255.0
persistence_timeout 20 #(同一IP的连接60秒内被分配到同一台realserver) protocol TCP #(用TCP协议检查realserver状态)
real_server 192.168.3.45 80 {
weight 3 #设置权重
TCP_CHECK {
connect_timeout 5 #(5秒无响应超时)
nb_get_retry 3
delay_before_retry 3
connect_port 80
}
}
real_server 192.168.3.47 80 {
weight 3
TCP_CHECK {
connect_timeout 5
nb_get_retry 3
delay_before_retry 3
connect_port 80
}
}
}
4、 配置keepadlived LVS-BACKUP(从)的配置文件如下:
# vi /etc/keepalived/keepalived.conf:
! Configuration File for keepalived
global_defs {
notification_email {
}
notification_email_from [email protected]
smtp_server 127.0.0.1
smtp_connect_timeout 30
router_id LVS2
}
vrrp_sync_group test {
group {
xxoo
}
}
vrrp_instance xxoo {
state BACKUP
interface eth0
lvs_sync_daemon_inteface eth0
virtual_router_id 51
priority 100
advert_int 5
authentication {
auth_type PASS
auth_pass 1111
}
virtual_ipaddress {
192.168.3.50
}
}
virtual_server 192.168.3.50 80 {
delay_loop 6
lb_algo rr
lb_kind DR
nat_mask 255.255.255.0
persistence_timeout 20
protocol TCP
real_server 192.168.3.45 80 {
weight 3
TCP_CHECK {
connect_timeout 5
nb_get_retry 3
delay_before_retry 3
connect_port 80
}
}
real_server 192.168.3.47 80 {
weight 3
TCP_CHECK {
connect_timeout 5
nb_get_retry 3
delay_before_retry 3
connect_port 80
}
}
}
5、在webserver 端创建脚本并启动:
# vi /etc/init.d/lvs_keepd.sh
# chmod a+x /etc/init.d/lvs_keepd.sh
# /etc/init.d/lvs_keepd.sh start
#!/bin/bash
# description: Config realserver lo and apply noarp
SNS_VIP=192.168.3.50
/etc/rc.d/init.d/functions
case "$1" in
start)
ifconfig lo:0 $SNS_VIP netmask 255.255.255.255 broadcast $SNS_VIP
/sbin/route add -host $SNS_VIP dev lo:0
echo "1" >/proc/sys/net/ipv4/conf/lo/arp_ignore
echo "2" >/proc/sys/net/ipv4/conf/lo/arp_announce
echo "1" >/proc/sys/net/ipv4/conf/all/arp_ignore
echo "2" >/proc/sys/net/ipv4/conf/all/arp_announce
sysctl -p >/dev/null 2>&1
echo "RealServer Start OK"
;;
stop)
ifconfig lo:0 down
route del $SNS_VIP >/dev/null 2>&1
echo "0" >/proc/sys/net/ipv4/conf/lo/arp_ignore
echo "0" >/proc/sys/net/ipv4/conf/lo/arp_announce
echo "0" >/proc/sys/net/ipv4/conf/all/arp_ignore
echo "0" >/proc/sys/net/ipv4/conf/all/arp_announce
echo "RealServer Stoped"
;;
*)
echo "Usage: $0 {start|stop}"
exit 1
esac
exit 0
6、启动验证:
# /etc/init.d/keepalived start
# ip add list
#watch ipvsadm –ln 查看lvs服务是否正常
#tail -f /var/log/message 监听日志,查看状态,测试LVS负载均衡及高可用性是否有效
停Master服务器的keepalived服务,查看BAKCUP服务器是否能正常接管服务
主意:多 VIP 多web 配置大概思路样、配置有点不一样:
! Configuration File for keepalived
global_defs {
notification_email {
}
notification_email_from [email protected]
smtp_server 127.0.0.1
smtp_connect_timeout 30
router_id LVS1
}
vrrp_sync_group test {
group {
xxoo
xxoo1
}
}
vrrp_instance xxoo {
state MASTER
interface eth0
lvs_sync_daemon_inteface eth0
virtual_router_id 51
priority 150
advert_int 5
authentication {
auth_type PASS
auth_pass 1111
}
virtual_ipaddress {
192.168.3.50
}
}
virtual_server 192.168.3.50 80 {
delay_loop 6
lb_algo rr
lb_kind DR
nat_mask 255.255.255.0
persistence_timeout 20
protocol TCP
real_server 192.168.3.45 80 {
weight 3
TCP_CHECK {
connect_timeout 5
nb_get_retry 3
delay_before_retry 3
connect_port 80
}
}
real_server 192.168.3.47 80 {
weight 3
TCP_CHECK {
connect_timeout 5
nb_get_retry 3
delay_before_retry 3
connect_port 80
}
}
}
vrrp_instance xxoo1 {
state MASTER
interface eth0
lvs_sync_daemon_inteface eth0
virtual_router_id 52
priority 150
advert_int 5
authentication {
auth_type PASS
auth_pass 111111
}
virtual_ipaddress {
192.168.3.55
}
}
virtual_server 192.168.3.55 80 {
delay_loop 6
lb_algo rr
lb_kind DR
nat_mask 255.255.255.0
persistence_timeout 20
protocol TCP
real_server 192.168.3.46 80 {
weight 3
TCP_CHECK {
connect_timeout 5
nb_get_retry 3
delay_before_retry 3
connect_port 80
}
}
real_server 192.168.3.48 80 {
weight 3
TCP_CHECK {
connect_timeout 5
nb_get_retry 3
delay_before_retry 3
connect_port 80
}
}
}
测试过 但木有成功 希望配置过的博友们能分享下!!
本文出自 “要成长要收获” 博客,请务必保留此出处http://s2t148.blog.51cto.com/3858027/888263


